
Installing a strainer in your kitchen sink is an essential step to ensure optimal functionality and prevent potential clogs in the plumbing system. In this step-by-step guide, we will walk you through the process of installing a strainer in your sink. From disassembling the strainer to checking for leaks, follow these instructions to complete a successful installation.
Step 1: Taking apart the sink strainer
To begin the installation, carefully take apart the sink strainer. Place the upper strainer body and white gasket into the sink hole. Ensure they fit snugly to create a watertight seal.

Step 2: Connect the lower strainer
Next, connect the lower strainer and black gasket together. These parts will be installed underneath the sink. Make sure they align properly and create a secure connection with the upper strainer body.
Step 3: Fixing the parts
To ensure the strainer remains securely in place, use screws to fix the upper and lower parts together. Tighten the screws evenly to maintain a stable installation. This step is crucial for preventing any future issues or unwanted movement.
Step 4: Connect the drain tail piece
Now that the strainer is properly fixed, it's time to connect the drain tail piece. This component connects the strainer to the plumbing system, allowing water to flow smoothly from the sink. Ensure a proper seal by tightening the connection securely.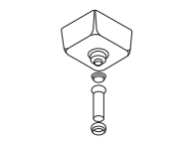
Step 5: Checking for leaks
Before completing the installation, it's important to check for any leaks. Run water and carefully observe the area around the strainer and drain tail piece. Look for any signs of water leakage and address them promptly if found. A leak-free installation is vital to avoid potential water damage.
Step 6: Insert the basket
To effectively filter out food particles and prevent clogging, insert the basket into the strainer. This will capture any debris and make it easier to clean. Regularly clean the basket to maintain optimal functionality.
By following this step-by-step guide, you can successfully install a strainer for your undermount kitchen sink. Remember to pay attention to details, such as tightening screws and checking for leaks. The strainer will help enhance the functionality of your sink and keep your plumbing system in excellent condition. Enjoy a clog-free kitchen experience!
Share:
Essential Tips for Undermount Kitchen Sink Kit Installation
Perfect Your Bathroom with a Pedestal Sink: Installation Made Easy